Sunday, July 31, 2011

Surprise Candy Box with Easel Card

I designed a second project for Craft Project Central this month.  This is the 10th and last project for the month. This surprise candy box is more than meets the eye.  It looks like a simple box on the outside but the inside is a cool new way to present chocolates.  The accompanying shaped easel card makes it the perfect gift for the men in your life.  Change up the stamps and paper to suit any occasion or holiday.  This is a great stamp camp or class project as well.  To get the instructions for this project, please visit Craft Project Central and subscribe to July HERE.

There were so many awesome projects this month.  For a mere $10, you will get the instructions for every single one of these projects including my surprise candy box with easel card tutorial.  What a deal!


BONUS PROJECT:
Please see Craft Project Central for details on how to get this extra project


Last Night for the Peachy Keen Sale! NEW STAMPS and my trip

Woo hoo!  I just got back from my weekend in Green Bay where I got to spend crafting time with the Peachy Keen Queen herself, Kathy Jakopovich.   I had a wonderful time crafting at the home office where I had access to just about every tool available!  To make it even more exciting, her very sweet husband Dave gave me and my friend a first hand demonstration of how they make the peachy stamps.  I tell you, he's a saint working back there in the "broiler oven".

Thank you to Kathy who was a very generous and gracious hostess.  She gave us so many wonderful goodies to craft with. We enjoyed our visit immensely and look forward to the next trip to Green Bay!

Now, all of you will be so jealous because I got to use the brand new stamps!  These stamps are AWESOME and you will want them all!  Some super cute new face sets and absolutely adorable new Christmas elves and other characters.  The Christmas in July sale ends tonight at 11:59 pm (central time) where you can save from 15% to 25% off your entire order!  Don't miss out on this deal because you will most definitely want to buy these new stamps when you see them!  Check out the sale details HERE.

The new Christmas Elves and Gingerbreads are large in size, ranging from about 4 3/4" to 5 1/2" tall.  These stamps will be perfect for gift packaging of goodies, scrapbook pages and even full size cards.  I'm looking forward to playing  with them all.  The new face sets are so sweet.  Check out the Winder Wonderland 1 1/8" stamps and the Snowmany Faces 1 1/8" stamps.  These are both available in the larger assortment packages as well.  The new Christmas Heads are going to be awesome on gift tags and the Snowman with Bunny is so cute and clever!

Friday, July 29, 2011

Punch Inspiration 7/29/11

Please note, there won't be any inspiration posts this weekend.  I'm taking a trip to Green Bay for some crafting fun with Kathy J., the Peachy Keen Queen!

Stitched Stocking Hobby Horse

Fascinator Frenzy

Breast Cancer Fundraiser

Mojo with a Flourish

sorry, I didn't have time to find more than this.  Have a great weekend!


Wednesday, July 27, 2011

Blog Candy Reminder

Good morning everyone. I just wanted to remind everyone that if you haven't done so already, please leave a comment HERE for a chance to win a free subscription to the upcoming fall edition of InkSpirations 4U. I have an awesome halloween punch art project in the upcoming edition that you will definitely want!

Monday, July 25, 2011

Craft Project Central Subscription Winner

Random.org selected #13 as winner of the July subscription to Craft Project Central.  Congratulations to Penny Silva!  Penny, please email me at paperpunchaddiction@gmail.com to claim your prize.


Sunday, July 24, 2011

Punch Inspiration 7/24/11

Just a reminder that I have 2 opportunities for blog candy.  All you have to do is leave a comment!  To win a Craft Project Central subscription, please go HERE.  To win an InkSpirations 4U Fall edition subscription, please go HERE.

Taco Card

Shabby Chic

Button Buddies

Tulips Beyond the Garden

Milk Carton Box

Black Cherry Suede

Micky & Mini Punch Art

Video of the day:
Welcome Birdhouse

Saturday, July 23, 2011

Punch Inspiration 7/23/11 & BLOG CANDY

Today I have a treat for you all.  Not only do I have my regular punch inspiration links but I have some blog candy to share.  Once again, I am designing for the upcoming InkSpirations 4U Fall Edition.  I get to share 2 free memberships with my readers!  The last edition was fabulous with many awesome projects so you definitely want to win this!  All you have to do is leave a comment on this post with your favorite new Stampin' Up! stamp set and/or product from the new catalog.  I would love to see what everyone's favorite things are!  On July 31st, I will draw 2 winners from all of the comments.  If you don't have an email in your profile, please provide one in your comment so I can contact the winner.

In case you missed it last night, I also posted my project for Craft Project Central this month.  I will be drawing a winner for a free July membership on Sunday night so be sure to jump on over to my post HERE and leave a comment.

Birthday Balloon

Hello Poppy

A Bit of Nature

Bring on the Cake

Hope Happens

3-D Projects:
Flappy Scrapbook Tutorial

Blossom Boxes

Video of the day:
Window Sheet Stamping

Friday, July 22, 2011

Party Favor Collection & BLOG CANDY

Time to share my project for Craft Project Central this month.  I created this cute collection of owl party favors using one of my new favorite designer series papers and one of my favorite punches!  To get the full tutorial for all of these favors, please visit Craft Project Central HERE and subscribe to July.  $10 for 10 fantastic tutorials!
BLOG CANDY ALERT!
Leave a comment here for a chance to win a FREE subscription to the July issue of Craft Project Central.  Don't worry, if you already subscribed and you win the drawing, you will get your member fee back!  I will draw the winner on Sunday night and announce the winner on Monday morning with the inspiration post.


Peachy Keen LFIF Challenge - So Punny

THE CHALLENGE
Puns are fun, and even more perfect when paired with Peachy Keen Faces! This week, create a project using your PKS faces along with any pun you'd like.

What exactly is a pun? 
A play on words, either on different senses of the same word or on the similar sense or sound of different words.

The PKS Design Team has created some fantasic Punny cards!  Check them out at the challenge blog HERE.  Play along on the challenge for a chance to win the Basic Paper Doll Face Assortment stamp set!  Guidelines and linking are at the challenge site.  

Peachy Keen has a great Christmas in July sale going on this weekend. Check it out HERE.

My little cow card was created using the Peachy Keen Critter Faces Medium PK-754 stamp set.  The greeting is from My Pink Stamper.  Instructions are below the picture.
click on photo for larger view

Udderly Amazing Instructions:

For the cow, punch the following pieces using Stampin' Up! punches:
  • 1-3-8" Circle in shimmery white - HEAD
  • Extra Large Oval in shimmery white - BODY
  • Modern Label in Shimmery white - NECK
  • (2) medium Boho Blossoms in early espresso - HAIR
  • (6) small flowers from Itty Bitty Shapes set in early espresso - SPOT
  • (1) wide petal from Blossoms Petal in early espresso (cut in half) - EARS
  • (2) 3/4" Circle in black - HOOVES
  • 1" Circle with 1-3/8" Circle in crumb cake (punch half of 1" circle, line up larger circle punch over top of punched hole and punch a moon shape) - HORNS
  • Decorative Label in crumb cake - SIGN 
Assembly of cow:
  • Sponge the edges of horns and sign with espresso ink.  
  • Sponge edges of hair with white craft ink.  
  • Stamp face with black ink.  Stipple or sponge regal rose ink onto nose.  Color tongue with rose marker and inside of mouth with black marker.  
  • Glue 2 spots onto head and cut away excess.  
  • Glue ears onto head.  Attach horns to back of head with dimensional.  
  • Attach head to neck with dimensional.  Glue spot onto neck.  
  • Glue neck onto back of body and glue spots onto body.
  • Clip a wedge out of each 3/4" black circle and cut off a little bit at the bottom to create hooves. 
  • Stamp greeting on sign with espresso ink.  Attach hooves to each side of sign with dimensionals.  Attach sign to body with dimensionals.
Card Assembly:
  • Cut 4" x 10" piece of early espresso card stock.  Fold in half and place onto Stampin' Up! Bigz Top Note Die.  Place the center fold of the card about 1/2" from the end of the die and cut.  You should now have one long piece that looks like 2 connected top note dies.
  • Score at the center of one top note end as shown.  Embellish the other end.  I embossed a piece of crumb cake card stock with the square lattice embossing folder and then cut half of a top note die shape.  Cut away outside edge along perforated line.  Sponge edges with espresso ink and glue onto card base.
  • For card top, emboss a piece of cherry cobbler card stock with wood grain (or other) embossing folder (I used Tim Holtz folder) then die cut Top Note.  Die cut an espresso top note piece.  Clip away outside perforated edges on cherry cobbler top note and glue onto espresso top note.  Lightly sponge surface with espresso ink.
  • Attach card top to base as shown in picture (tape shown on upper portion of scored end).
  • Tie cherry cobbler seam binding ribbon around base of card.  

Punch Inspiration 7/22/11

Good morning everyone! The weather here if finally beautiful after going through the worst heat and humidity of our state history.  Just a reminder to come back at 10 am for the PKS challenge and another fun punch art project!

Clothesline Thank You Card

Lets Sail Away

Punchy Birthday

Piano Punch Art

Elegant Butterfly

Up & Away

Video of the day:
Wild Women Punch Art


Friday, July 15, 2011

Papers & Pixels - I designed the cover!

Please note, I don't have inspiration links for you today.  Instead, I have a collection of awesome step by step tutorials! Click on the link below the picture.

I was so excited when Laura asked me to design the cover for July's issue of Papers and Pixels magazine.  My collection features fun summer colors and super party favors to share.  The tutorials for all of my projects are featured in the magazine as well as an interview.  If you haven't done so already, you can subscribe for free.  The site has been updated, so it's super easy to access the current and past issues as well.  Go HERE to sign up and download the current issue.


Download my tutorial by clicking HERE

Wednesday, July 13, 2011

Pop Up Stage Technique Video Tutorial

My pop up stage technique will be the featured tutorial at Splitcoast Stampers this week.  If you would like the written tutorial for this project, please visit the resources section of Splitcoast Stampers HERE.  For more pop up stage ideas, please see my other post HERE.


Friday, July 8, 2011

Peachy Keen LFIF Challenge + Triple Layer Pop Up Card tutorial

Good morning everyone!  I have another exciting new card technique to share.  This one is sure to wow your friends!  For the step by step tutorial, scroll down the page.  Just a reminder, if you haven't done so already, you can download a pdf document of ALL peachy keen and punch art projects ever shared on my blog.  Click HERE to download.

Today's Peachy Keen Challenge was to create a project featuring patterned papers.  I am a paper addict, so this one was right up my alley!  I'm so in love with the latest stamp release so I wanted to use them again.  The kitty and mouse are from the PK-289 Mitsy Sue and Colby Cheer Up stamp set.  I changed the faces to happy faces using the PK-291 Sampler Package of Faces set.   The design team totally rocked on this challenge!  You have to jump on over to the challenge site and check out the other awesome projects HERE.


I recently created a video of this technique.  Check it out HERE.

Triple Layer Pop Up Card Tutorial:
*click on photos for a closer look

1) Cut the following pieces of card stock for the basic card:
  • 4-1/4" x 11" for card base
  • 3/4" x 9-3/4" for middle layer pop up strip
  • 3/4" x 8-3/4" for top layer pop up strip
  • Four pieces 1/2" x 3-1/2" for pop up support tabs
Fold card base in half and decorate inside before attaching any of the pop up pieces.  Create decorations for middle layer which will be attached before attaching the top pop up layer piece.  For my card, I created a whole strip of grass with flowers.  You do not have to cover the pop up layer pieces like this.  If you want to attach smaller pieces, you can.  Keep in mind that this card will be rather thick when closed, so try to use thinner designer papers and embellishments.


2)  Score the four pop up support tabs at 1-1/8", 1-1/2", 2-5/8", 3".  Apply strong adhesive to 1/2" tab on end of strip and attach to other end to form box shaped ring.

3) Fold the middle and top layer pop up strips in half.  Attach decorations to front of each strip.  Flip over to back side and attach the pop up support tabs on each side of the score line.

4) Fold middle layer strip in half, right sides together.  Push pop up supports in the direction shown on picture.  Apply sticky strip to rear pop up support piece. Attach to card base on the right side of center score line as shown.  Add sticky strip to support tab on top as shown.


5) Carefully open middle layer back up and attach other support tab to the left of the center score line on card base.  Repeat step 4 for top layer.  Open up and attach other side to left of the center score line. 

Once attached, the layers look like this from the bottom of the card:

The layers look like this from the top of the card:

The card will be thick when closed.  I suggest wrapping a ribbon or belly band around the outside of card to keep it closed.

To create the mouse and kitty, I stamped one of each on two different patterned papers.  Then I cut out the ear and belly pieces on one pattern and glued onto the other stamped pieces.  This technique is so easy but it looks so beautiful.  This also saves the time to color the images in.

Punch Inspiration 7/8/11

Good morning everyone, just a reminder to come back at 10 am today for another Peachy Keen challenge!  This time, I have a cool new pop up card technique tutorial to share!

Playing with Colors

Frosted Cone

Bumble Bee

Established Elegance

Birthday Banner

Icecream Collection

Birthday Girl

3-D Projects:
Pocket of Memories free tutorial

Video of the day:
Paper Bag card

Thursday, July 7, 2011

Peachy Keen Connection Fan Forum Site

Hello all, I would like to invite you all to join me over at the brand new Peachy Keen Stamps Connection site for all of the PKS fans out there!  As you know, I love my Peachy Keen Face stamp.  They add so much character and beauty to my punch art.  Hop on over to the new site and join for free.  It's a great place to meet other fans, discuss PKS and other products on the market, view the hundreds of gorgeous ideas already in the gallery, view technique videos, participate in swaps and challenges and many other fun activities!  Don't have a blog?  You can quickly and easily start one on the site for free and instantly have an audience.  We went live yesterday and in one day, we already have almost 1000 members!  How cool is that? 

EDIT:  The board isn't open for direct linking yet.  To join, please visit the Peachy Keen facebook page and click on the link provided on the newest post to the wall HERE.

Thanks to Ruthie, I think this link will work as well:
 http://peachykeenstamps.ning.c​om/?xgi=4Qp1ccpqgP49Pz


Thanks!

Wednesday, July 6, 2011

Paper Punch Addiction Blog Projects Document

Have you ever wished you could have one big document of all my free punch art projects? Well I have a treat for you! I recently ordered a pdf copy of my blog from Blog2Print. I was able to create a customized pdf document of all my blog posts from the beginning of my blog in September 2009 through my punch art monkey project shared last week.

This pdf document is FREE for all of my readers to download! It includes the following:

ALL of my free tutorials
ALL of my Peachy Keen LFIF Challenge projects
ALL of my Papers & Pixels tutorials
Details and preview pictures of my punch art classes for sale.

This file is large. It's approximately 7MB in size so it may take some time to download, depending on how fast your internet connection is. It's totally worth it! Please note that this file is not for resale. Please notify me if you see anyone selling or distributing this file anywhere. Additionally, please send your friends to my blog to download the file themselves instead of sharing directly.  You may print a copy of this document for your own personal use.  It may not be distributed in any other manner.  Thank you!

Please note, this document does not include my daily inspiration posts, Craft Project Central posts or other items not related to punch art or Peachy Keen.

Many of the URL links are there so you can click on them for more information. Most of my Paper's and Pixels projects do not have a clickable link in the document. To download these tutorials, you will need to visit my blog and select it from my Free Tutorials listing.

ENJOY!!!

CLICK HERE TO DOWNLOAD THE PDF DOCUMENT

Tuesday, July 5, 2011

Easy Canvas Prints

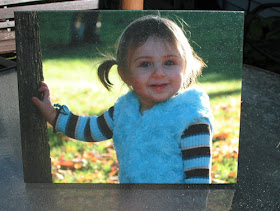
Good morning everyone, I wanted to share this awesome new website I recently discovered.  The site is called Easy Canvas Prints.  They take your cherished photos and print them onto artist canvas and then stretch onto an art frame.  When completed, the photo looks like it was painted right onto the canvas by an artist!  There is a great variety of sizes and options for finishing the edges of the canvas and they will retouch the photos for you as well.

I wanted to share a picture of my canvas with you.  This is a picture of my daughter that was taken shortly after she turned one.  She was standing under a shade tree with the sun hitting her hair and leaves in the background. My picture doesn't quite give this canvas justice.  It is really more beautiful in person.  The colors on the canvas came out so rich and brilliant.  If you are looking for a special gift to give someone, consider a canvas print.  They are so beautiful that you will want to get several for your home.  They actually have a sale going on right now, so you should check it out right away.


Friday, July 1, 2011

Punch Inspiration 7/1/11

Before I get to my inspiration links, you may have wondered how I choose the inspiration projects to share?  For cards, they need to use at least one Stampin' Up! punch.  It may not be punch art but simply a punch providing a beautiful embellishment for the card.  For the 3-D items, it will usually feature a punch but may feature Sizzix dies or other Stampin' Up! products instead.  For the video, anything goes.  If I think it's a cool project or technique, I share it, regardless of what products are used on the project. 

Blossom Petals

Celebration

Awash with Flowers

Popped Doilies

Beach Scene

Cutest House on the Block

Video of the Day:
Watercolor Flower

Please note, I am taking the long holiday weekend off.  I will resume posting my daily inspiration on Tuesday.  Thanks!